Adding Authentication to Your Blazor Server App (.NET) with PropelAuth
Blazor is a modern way to build interactive web applications entirely in C#. For .NET developers, it’s an excellent opportunity to leverage existing skills and code without juggling multiple languages (or to avoid Javascript as much as possible).
In this guide, we’ll show you how to secure your .NET Blazor Server application (created with dotnet new blazor) with PropelAuth. We’ll focus on:
- Setting up authentication smoothly
- Securing pages and displaying user information
- Adding multi-tenancy support
For our example, we’ll create a simple CRM where Leads represent potential deals. These leads belong to Organizations (your customers), and we’ll ensure only authorized users can access them.
Ready to add security without all the complexity? Let’s dive in!
Getting Started
First, create a new Blazor Server application:
dotnet new blazor -o MyBlazorApp -f net9.0
By default, this produces a server-side Blazor project. Next, add PropelAuth to your project:
dotnet add package PropelAuth
Initializing PropelAuth
Since we're using Blazor Server, we can configure PropelAuth with OAuth for a smooth login flow. Add the following to your Program.cs file:
await builder.Services.AddPropelAuthAsync(
    new PropelAuthOptions(
        apiKey: "YOUR_API_KEY",
        authUrl: "YOUR_AUTH_URL",
        oAuthOptions: new PropelAuth.Models.OAuthOptions(
            clientId: "YOUR_CLIENT_ID",
            clientSecret: "YOUR_CLIENT_SECRET",
            callbackPath: "/auth/callback"
        )
    )
);
These values can all be found on the PropelAuth dashboard, and you can see specific instructions for getting them here.
This tells your Blazor Server app to handle OAuth handshakes with PropelAuth behind the scenes, using .NET’s built in OAuth support.
Note: If you're only using .NET as a backend with a separate frontend (React, Angular, etc.), you can omit oAuthOptions and initialize the library for token-based authentication. This will assume you are passing in access tokens via the Authorization header, which our Javascript / React libraries have functions to get.
Locking Down Pages
Add the following imports to _Imports.razor:
@using Microsoft.AspNetCore.Authorization
@using Microsoft.AspNetCore.Components.Authorization
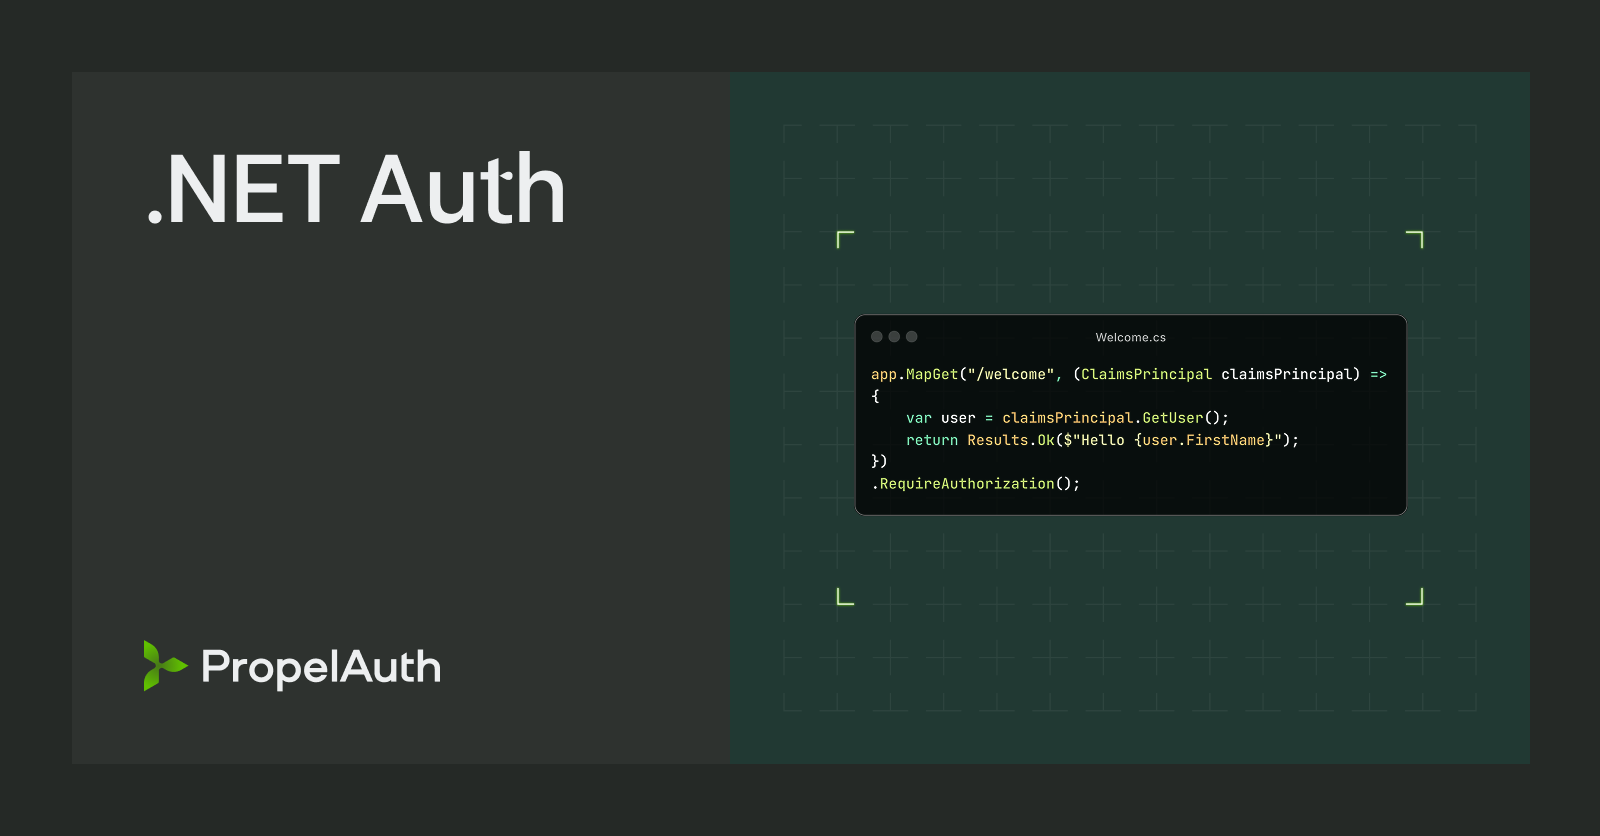
Then, in Components/Pages/Home.razor, add the [Authorize] attribute:
@page "/"
@attribute [Authorize]
When visiting the / route of your application, you'll be prompted to log in first, ensuring only authenticated users can reach that page.
Displaying User Information
Once the user is logged in, showing them their info can be useful. Here’s one example of how you can do that using the User object:
@page "/"
@attribute [Authorize]
@inject AuthenticationStateProvider AuthenticationStateProvider

<PageTitle>Home</PageTitle>

<h2>User Profile</h2>

<div><strong>Email:</strong> @User.Email</div>
<div><strong>User ID:</strong> @User.UserId</div>

@code {
    private PropelAuth.Models.User? User { get; set; }

    protected override async Task OnInitializedAsync()
    {
        var authState = await AuthenticationStateProvider.GetAuthenticationStateAsync();
        var claimsPrincipal = authState.User;
        User = claimsPrincipal.GetUser();
    }
}
You can add additional properties to the user, optionally collect them on signup, and render them here as well. The full User object is documented here.
Multi-tenant Authentication
If you're building a B2B SaaS, you'll likely need multi-tenancy. PropelAuth makes it simple. For example, you can call any of these functions:
@User.GetOrgs() // Gets all organizations the user is part of
@User.GetOrg(orgId) // Gets this user's details in a specific organization
@User.IsRole(orgId, "Admin") // Checks if the user has an Admin role in that org
@User.HasPermission(orgId, "CanViewLeads") // Checks a specific permission
Use these methods to customize the UI or enforce role-based access. In our CRM scenario, in addition to the obvious restriction that users should only be able to see Leads in their own org(s), you can add additional restrictions like only Admins can delete Leads.
A Simple Example: Managing Leads with a Scoped Service
Below, we’ll show how to display leads for a user’s organization, using a helper function to pick the orgId.
1. Create a Scoped Service
public interface ILeadService
{
    Task<IEnumerable<Lead>> GetLeadsForOrgAsync(string orgId, string userId);
}

public class LeadService : ILeadService
{
    public Task<IEnumerable<Lead>> GetLeadsForOrgAsync(string orgId, string userId)
    {
        // In a real app, you'd pull from a database using the orgId and userId
        var sampleLeads = new List<Lead>
        {
            new Lead { LeadId = 1, CompanyName = "Acme Corp", Status = "New" },
            new Lead { LeadId = 2, CompanyName = "Globex", Status = "In Progress" }
        };

        return Task.FromResult<IEnumerable<Lead>>(sampleLeads);
    }
}

public class Lead
{
    public int LeadId { get; set; }
    public string CompanyName { get; set; } = string.Empty;
    public string Status { get; set; } = "New";
}
Do I need [Authorize] here? Typically, we place [Authorize] on controllers or Razor pages in Blazor Server, not on service or model classes. By the time the code in this service runs, the Blazor page (or API endpoint) will already have confirmed the user is authorized.
2. Register the Service
In Program.cs (or wherever you configure services):
builder.Services.AddScoped<ILeadService, LeadService>();

await builder.Services.AddPropelAuthAsync(
    // ...
);
3. Use the Service in a Page
Create or update a page, say Leads.razor, that displays leads for the user’s organization:
@page "/leads"
@attribute [Authorize]
@inject AuthenticationStateProvider AuthenticationStateProvider
@inject ILeadService LeadService

<h2>Your Organization's Leads</h2>

@if (leads?.Any() == true)
{
    <table>
        <thead>
            <tr>
                <th>Lead ID</th>
                <th>Company Name</th>
                <th>Status</th>
            </tr>
        </thead>
        <tbody>
        @foreach (var lead in leads)
        {
            <tr>
                <td>@lead.LeadId</td>
                <td>@lead.CompanyName</td>
                <td>@lead.Status</td>
            </tr>
        }
        </tbody>
    </table>
}
else
{
    <p>@message</p>
}

@code {
    private PropelAuth.Models.User? User { get; set; }
    private IEnumerable<Lead>? leads;
    private string? message;

    protected override async Task OnInitializedAsync()
    {
        // 1. Grab the current user.
        var authState = await AuthenticationStateProvider.GetAuthenticationStateAsync();
        User = authState.User.GetUser();
        if (User == null)
        {
            message = "Unable to determine authenticated user.";
            return;
        }

        // 2. Get the current orgId we are referencing
        var orgId = GetOrgIdOrDefault(User);
        if (string.IsNullOrEmpty(orgId))
        {
            message = "No organization found for this user.";
            return;
        }

        // 3. Check for permissions.
        if (!User.HasPermission(orgId, "CanViewLeads"))
        {
            message = "You do not have permission to view leads.";
            return;
        }

        // 4. Fetch leads.
        try
        {
            leads = await LeadService.GetLeadsForOrgAsync(orgId, User.UserId);
        }
        catch (Exception ex)
        {
            message = $"Error retrieving leads: {ex.Message}";
        }
    }

    private string? GetOrgIdOrDefault(PropelAuth.Models.User user)
    {
        // TODO: implement
    }
}
Here, the [Authorize] attribute ensures the user is authorized server-side.
Allowing the user to select an organization
Within PropelAuth, you have options for how many orgs a user can be in. A common example is to require that they are in at least one organization - meaning they must either create an organization or be invited to an existing one.
Depending on your application, you can either limit users to be in one organization, or you may want to allow users to be in more than one organization at a time. Contractors are a common case where users could be in multiple organizations.
The User object itself has a function User.GetOrgs() which returns all the orgs the user is in. However, you likely don’t want to call User.GetOrgs().FirstOrDefault()?.OrgId each time or rely solely on that default. If your user frequently switches between multiple organizations, you might:
- Let them select an organization in the UI.
- Store that
orgIdin a cookie. - Use that stored value as a fallback next time they visit.
Below is a placeholder helper function that attempts to retrieve a previously stored orgId, and if none is found, uses the first org the user is in.
private string? GetOrgIdOrDefault(PropelAuth.Models.User user)
{
    if (HttpContextAccessor.HttpContext != null)
    {
        string? cookieOrgId = HttpContextAccessor.HttpContext.Request.Cookies["SelectedOrgId"];
        if (!string.IsNullOrEmpty(cookieOrgId))
        {
            return cookieOrgId;
        }
    }

    // Fallback to the first org from user's list
    return user.GetOrgs().FirstOrDefault()?.OrgId;
}
We can then select an organization by setting a cookie:
private void SelectOrganization(string orgId)
{
    if (HttpContextAccessor.HttpContext != null)
    {
        // Configure cookie options
        var cookieOptions = new CookieOptions
        {
            Expires = DateTime.Now.AddDays(14),
            HttpOnly = true,
            Secure = true,
            SameSite = SameSiteMode.Lax
        };

        // Set the cookie
        HttpContextAccessor.HttpContext.Response.Cookies.Append("SelectedOrgId", orgId, cookieOptions);

        // After setting the cookie, you might want to refresh the page or data
        // to reflect the organization change
    }
}
And that’s all we need! We can add additional functions to the LeadService for creating/deleting leads and protect those with the same primitives we have already seen.
Best of all, we can do the majority of our work in C#, relying on a well-typed User object.
Conclusion
By combining Blazor’s authorization attributes, server-side code in .NET, and a user-friendly authentication service like PropelAuth, you can:
- Keep your Blazor Server application secure.
- Support multi-tenancy with role- and permission-based checks (perfect for a multi-organization CRM scenario).
- Provide a seamless login experience for your users.
- Use a helper function to choose a preferred org—giving you easy fallback behavior.
With this minimal configuration, you get a complete solution—users can log in, see their info, and access only the data they’re permitted to see.
For more details and additional examples, check out the PropelAuth .NET reference docs.
Happy coding!