
Spring Boot Authentication and Authorization w/ Spring Security

Spring Boot makes it easy to create stand-alone, production-grade applications. Spring Security is the standard for securing Spring-based applications.
In this post, we’ll look at a common way to set up Spring Boot as your backend with a separate frontend (with something like React, for example), multi-tenancy, and roles/permissions.
Ultimately, we’d like to write code that looks like this:
@Bean
public SecurityFilterChain securityFilterChain(HttpSecurity http, JwtDecoder jwtDecoder, Authz authz) throws Exception {
    // Gate access to routes by the users role or permission in their organization
    http.authorizeHttpRequests((requests) -> requests
        .requestMatchers("/billing/**").access(authz.hasPermissions("can_manage_billing"))
        .requestMatchers("/reports/**").access(authz.hasPermissions("can_manage_reports"))
        .requestMatchers("/admin/**").access(authz.hasRoles("Admin"))
        .anyRequest().access(authz.isInOrg())
    )
    .oauth2ResourceServer((oauth2) -> oauth2.jwt(jwt -> jwt.decoder(jwtDecoder)));

    return http.build();
}

@Bean
public Function<HttpServletRequest, String> orgIdResolver() {
    return (request) -> request.getHeader("x-org-id");
}
where we can easily protect routes based on the users’ roles and permissions.
Spring Boot as a backend
While it’s true that Spring Boot can be used as a full-stack framework, more often than not it’s advantageous to have a separate frontend that uses more standard frameworks like React, Svelte, Vue, etc instead of creating Thymeleaf templates.
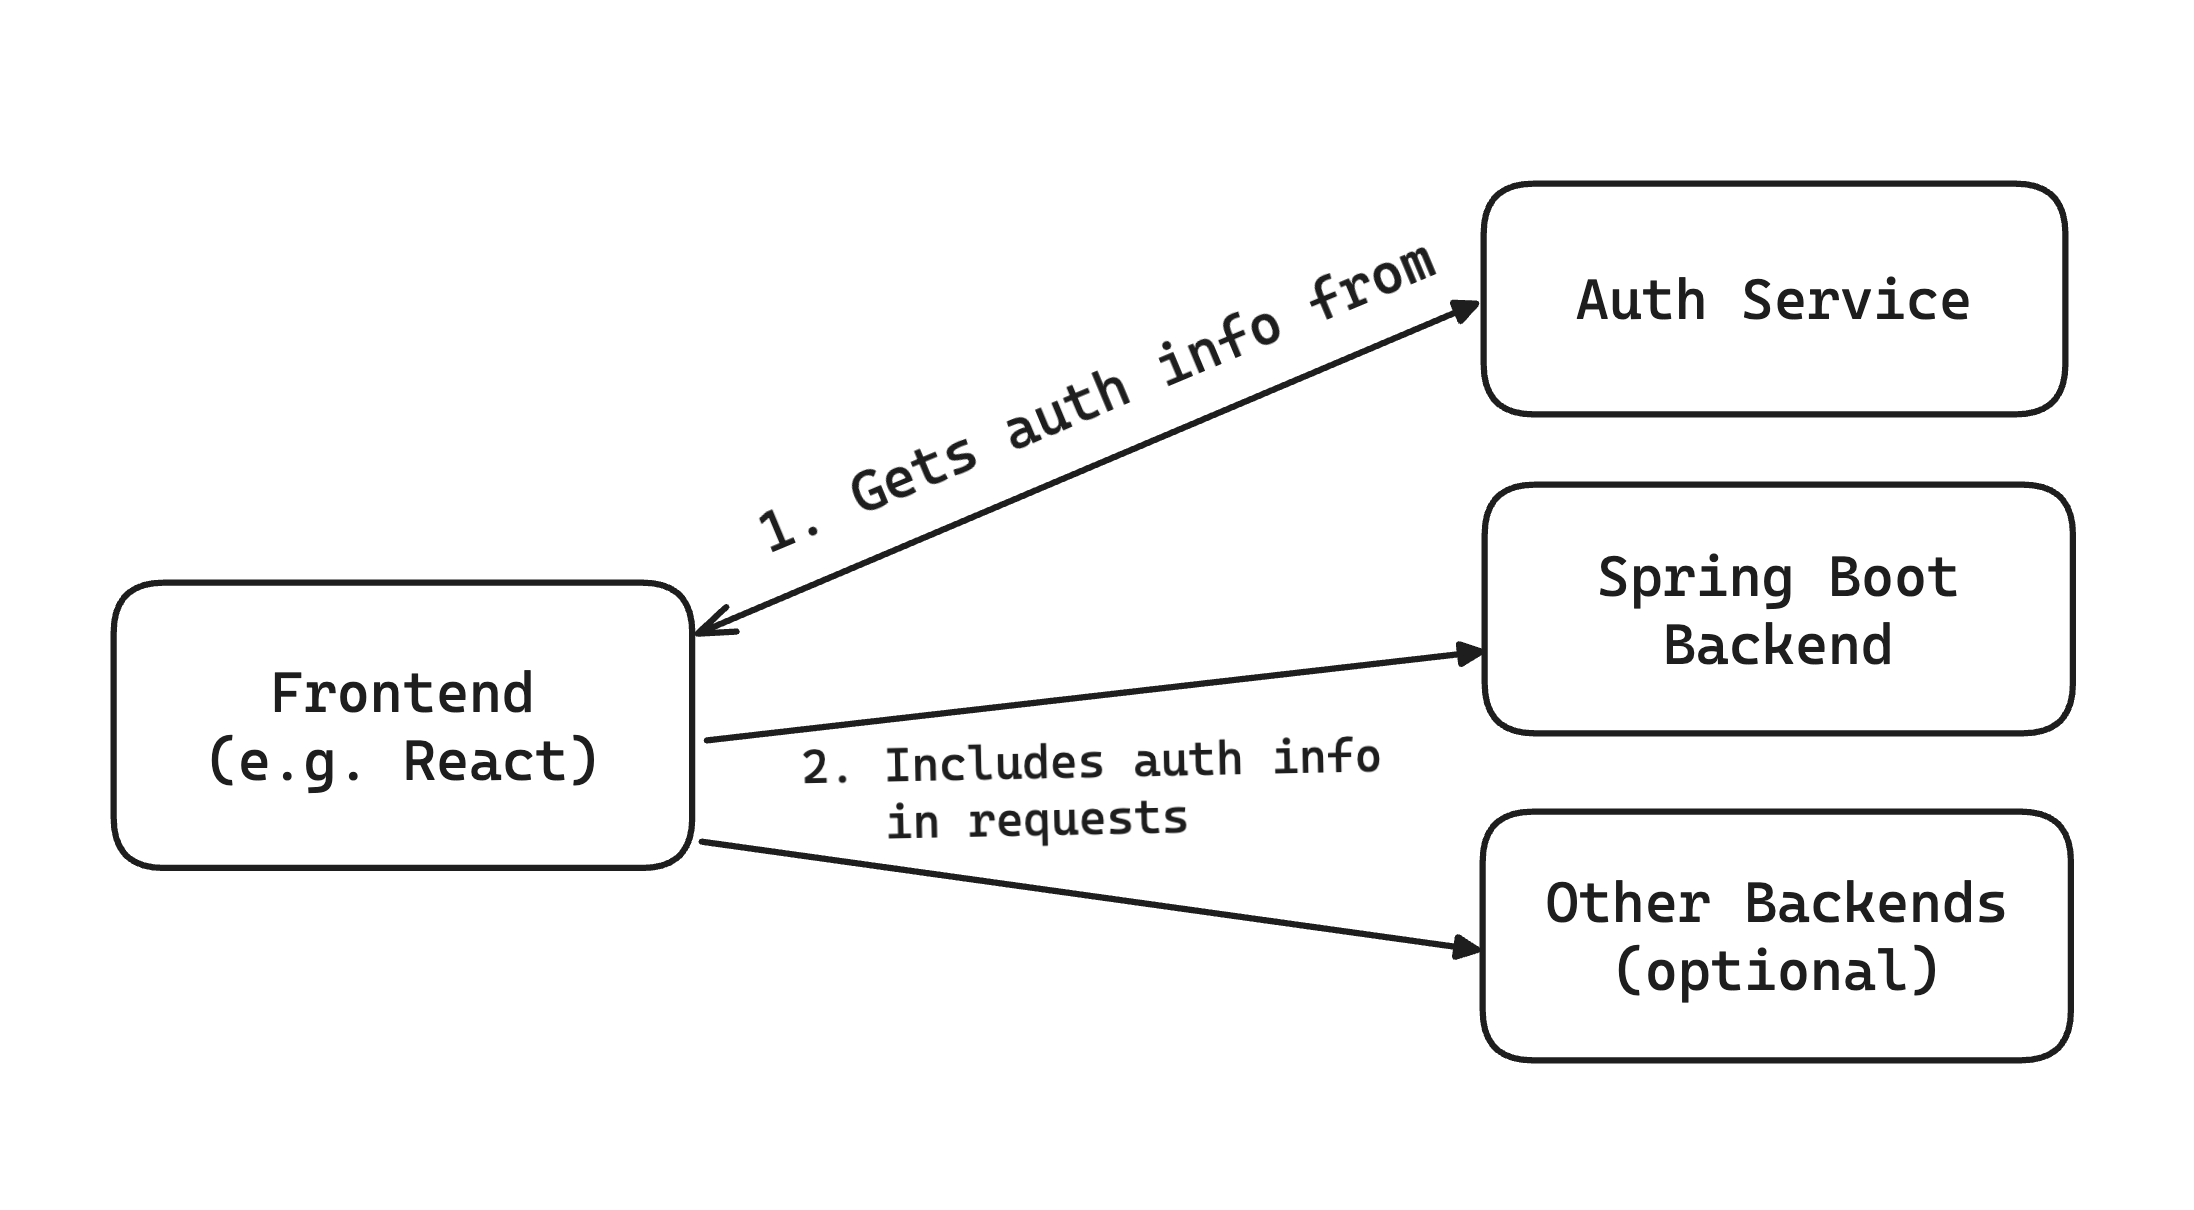
If you are using an external auth service, like PropelAuth, this is made even easier as the authentication flows can happen outside of your backend, and it leads to this really nice simplifying assumption:
When a request is made to your Spring Boot service, it includes an authentication token for the user.
Here’s an example of what this looks like:
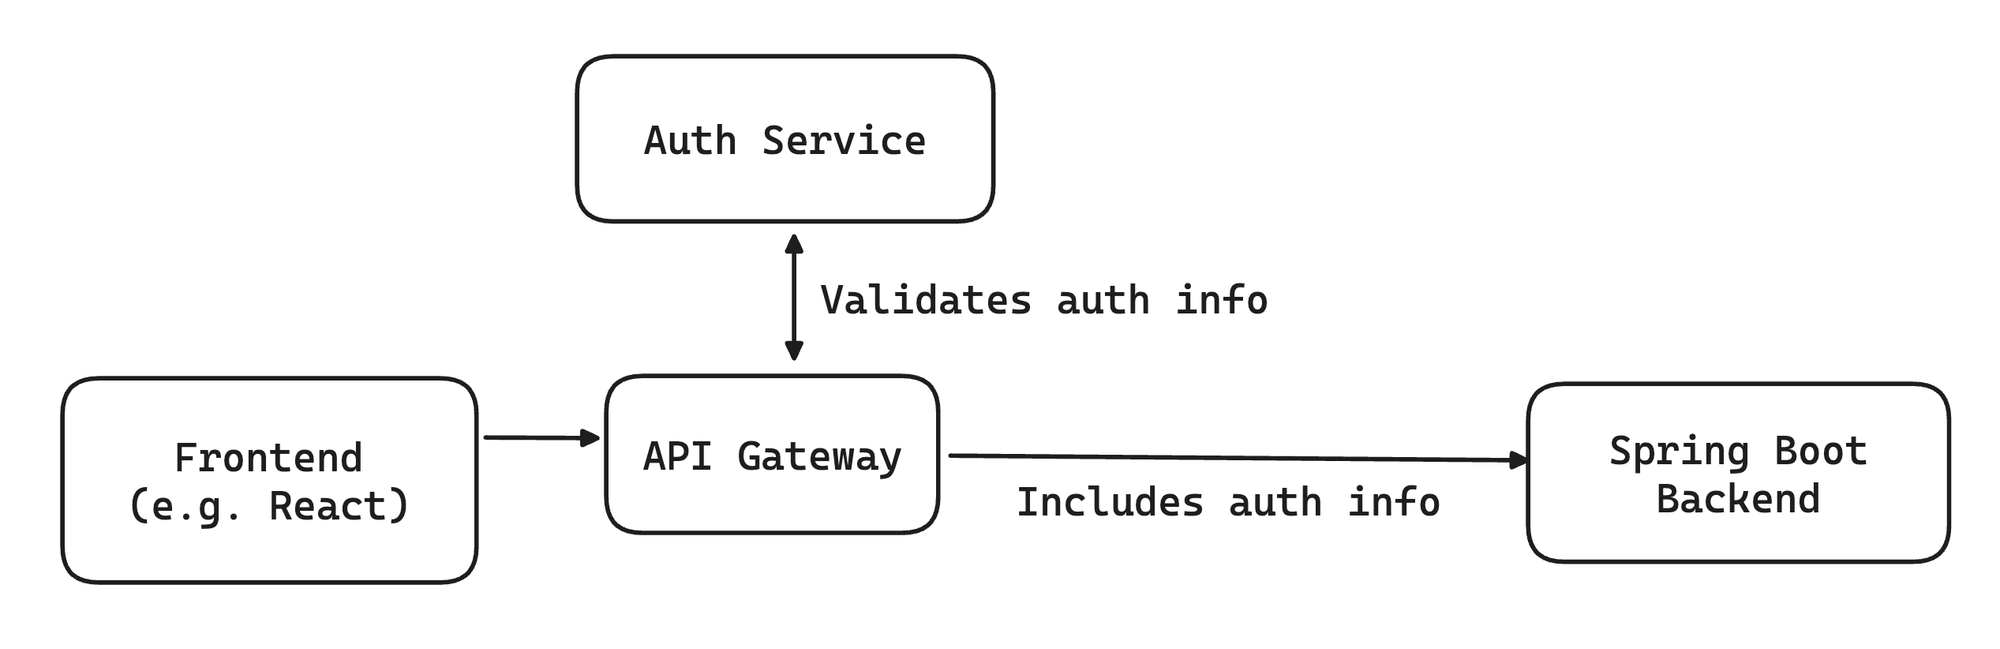
Another common way you can get that simplifying assumption is if you have a service that sits between your frontend and backend and handles the authentication for you. Sometimes this is an API Gateway, sometimes this is a proxy / load balancer, and sometimes this is a full stack framework like Remix/Next.js in a Backend for your Frontend style setup:
No matter what your setup is, there are two important things that the backend must do:
- Validate the authentication info sent to Spring Boot as part of a request (authentication)
- Make sure the user has permission to make the request (authorization)
Validating and identifying our users in Spring Boot
We’ll assume that we have a simple frontend making this request:
// access tokens are JWTs provided by @propelauth/react or @propelauth/javascript
async function whoAmI(accessToken) {
    return fetch('/api/whoami', {
        method: 'GET',
        headers: {
            Authorization: `Bearer ${accessToken}`,
        },
    }).then((res) => res.json())
}
If you want to learn about how to set up your frontend with PropelAuth, you can read more about it here.
We’ll also assume that you have a Spring Boot application set up with the following dependencies:
org.springframework.boot:spring-boot-starter-securityorg.springframework.boot:spring-boot-starter-oauth2-resource-server
If you don’t have a project already, the Spring Initializr makes it really easy to create a new one.
Finally, we’ll create this API to handle the request from the frontend:
import org.springframework.web.bind.annotation.GetMapping;
import org.springframework.web.bind.annotation.RestController;

@RestController
class TestApi {
    @GetMapping("/api/whoami")
    String whoAmI() {
        return "I'm not sure...";
    }
}
We now have all the pieces in place to protect this route. Let’s create a new file called WebSecurityConfig with the following implementation:
@Configuration
@EnableWebSecurity
public class WebSecurityConfig {
    @Bean
    public SecurityFilterChain securityFilterChain(HttpSecurity http) throws Exception {
        http.authorizeHttpRequests((requests) ->
            requests.anyRequest().authenticated()
        );
        return http.build();
    }
}
This makes it so any request sent from the frontend must be authenticated. If we go back to our frontend and look at the requests it’s making, we’ll see that the requests are now failing with a Forbidden exception.
The reason for this is pretty simple - we haven’t told our framework what authenticated means (in other words, how to validate the users token).
Luckily, this is pretty straightforward:
@EnableWebSecurity
public class WebSecurityConfig {
    @Bean
    public SecurityFilterChain securityFilterChain(HttpSecurity http, JwtDecoder jwtDecoder) throws Exception {
        http.authorizeHttpRequests((requests) -> requests
            .anyRequest().authenticated()
        ).oauth2ResourceServer((oauth2) -> oauth2
            .jwt(jwt -> jwt.decoder(jwtDecoder))
        );
        return http.build();
    }

    @Bean
    public JwtDecoder jwtDecoder() {
        return JwtDecoders.fromIssuerLocation("YOUR_AUTH_URL");
    }
}
Since our accessToken is a JWT, we can use the JwtDecoder class to validate it. You can specify the JwtDecoder in a few ways, but the simplest is just providing your PropelAuth authentication URL and it will automatically pull in your public key.
If you go back to your frontend, you’ll see the requests are now succeeding! The only problem is they are always returning I'm not sure. Let’s update our API:
@GetMapping("/api/whoami")
Map<String, Object> whoAmI(@AuthenticationPrincipal Jwt jwt) {
    return jwt.getClaims();
}
This will return all the information we have in the token for that user. If you wanted to return just the email address, for example, you can do:
@GetMapping("/api/whoami")
String whoAmI(@AuthenticationPrincipal Jwt jwt) {
    return jwt.getClaim("email");
}
Most commonly, though, you’ll want to get the user_id claim, in case you need to persist any information related to the user.
Multi-Tenant support
PropelAuth was built from the ground up for B2B / Multi-Tenant products. This means that, out of the box, you get everything you need to support onboarding groups instead of just individuals - organizations, invite flows, RBAC, enterprise SSO, etc.
This means that our users can be in one, or potentially many, organizations. And they will have a role in that organization.
In the next section, we’ll look at how to validate that the user has permission to make a request based on the organization they are in, the role that they have, and/or the permissions that are associated with that role.
Does the user have permission to make the request?
So far, we’re just checking to make sure the user is authenticated at all. However, we may have API routes where we need additional checks. You may want to limit who can modify billing information to just Admins, for example.
To do that, we’re going to make use of the AuthorizationManager. Here’s a no-op implementation to get us started:
public final class NoOpAuthorizationManager implements AuthorizationManager<RequestAuthorizationContext> {
    @Override
    public AuthorizationDecision check(Supplier<Authentication> authentication, RequestAuthorizationContext context) {
        return new AuthorizationDecision(true);
    }
}
Pretty straightforward, we are passed in Authentication and the request itself, and we can decide if the request should be allowed.
Here’s a commented version which will do a few things:
- (Optionally) Check to see if the user is in the specified organization
- (Optionally) Check to see if the user has the correct role(s) in that organization
- (Optionally) Check to see if the user has the correct permissions(s) in that organization
public final class PropelAuthAuthorizationManager implements AuthorizationManager<RequestAuthorizationContext> {
    private final Function<HttpServletRequest, String> organizationIdResolver;
    private final Set<String> requiredRoles;
    private final Set<String> requiredPermissions;

    PropelAuthAuthorizationManager(Function<HttpServletRequest, String> organizationIdResolver, Set<String> requiredRoles, Set<String> requiredPermissions) {
        this.organizationIdResolver = organizationIdResolver;
        this.requiredRoles = requiredRoles;
        this.requiredPermissions = requiredPermissions;
    }

    @Override
    public AuthorizationDecision check(Supplier<Authentication> authentication, RequestAuthorizationContext context) {
        // First, let's make sure that we are only checking a JWT
        // If you have multiple auth sources, you may need to branch here
        Object principalObj = authentication.get().getPrincipal();
        if (!(principalObj instanceof Jwt)) {
            return new AuthorizationDecision(false);
        }
        Jwt jwt = (Jwt) principalObj;

        // Since users can potentially be in more than one organization,
        // we provide an organizationIdResolve to tell this function
        // where the organization ID is.
        // You may, for example, pass in an orgId as a path parameter
        // or as it's own header (e.g. x-org-id)
        String organizationId = organizationIdResolver.apply(context.getRequest());
        if (organizationId == null) {
            return new AuthorizationDecision(false);
        }

        // This checks if the user is in the organization at all
        Map<String, Object> orgIdToOrgMemberInfo = jwt.getClaim("org_id_to_org_member_info");
        if (orgIdToOrgMemberInfo == null) {
            return new AuthorizationDecision(false);
        }
        // orgMemberInfo will contain information about organization
        // and the user's role/permissions within it
        Map<String, Object> orgMemberInfo = (Map<String, Object>) orgIdToOrgMemberInfo.get(organizationId);
        if (orgMemberInfo == null) {
            return new AuthorizationDecision(false);
        }

        // This checks to make sure the user has all the roles in the inputted set
        if (requiredRoles != null && !requiredRoles.isEmpty()) {
            if (!orgMemberInfoContainsAll(orgMemberInfo, "inherited_user_roles_plus_current_role", requiredRoles)) {
                return new AuthorizationDecision(false);
            }
        }

        // This checks to make sure the user has all the permissions in the inputted set
        if (requiredPermissions != null && !requiredPermissions.isEmpty()) {
            if (!orgMemberInfoContainsAll(orgMemberInfo, "user_permissions", requiredPermissions)) {
                return new AuthorizationDecision(false);
            }
        }

        // If we passed all the above checks, we are good to go!
        return new AuthorizationDecision(true);
    }

    private boolean orgMemberInfoContainsAll(Map<String, Object> orgMemberInfo, String fieldName, Set<String> requiredValues) {
        Object values = orgMemberInfo.get(fieldName);
        return values instanceof Collection &&
                ((Collection<String>) values).containsAll(requiredValues);
    }
}
We can then wrap this all up in a nice factory:
@Component
public class Authz {
    private final Function<HttpServletRequest, String> orgIdResolver;

    @Autowired
    public Authz(Function<HttpServletRequest, String> orgIdResolver) {
        this.orgIdResolver = orgIdResolver;
    }

    public PropelAuthAuthorizationManager isInOrg() {
        return new PropelAuthAuthorizationManager(orgIdResolver, null, null);
    }

    public PropelAuthAuthorizationManager hasRoles(String... roles) {
        return new PropelAuthAuthorizationManager(orgIdResolver, Set.of(roles), null);
    }

    public PropelAuthAuthorizationManager hasPermissions(String... permissions) {
        return new PropelAuthAuthorizationManager(orgIdResolver, null, Set.of(permissions));
    }
}
The final step is to hook this up in our SecurityFilterChain. Let’s make it so anyone can access the /api/whoami route, but we’ll introduce new routes with more specific constraints:
@Bean
public SecurityFilterChain securityFilterChain(HttpSecurity http, JwtDecoder jwtDecoder, Authz authz) throws Exception {
    // Gate access to routes by the users role or permission in their organization
    http.authorizeHttpRequests((requests) -> requests
        .requestMatchers("/api/whoami").authenticated()
        .requestMatchers("/api/billing/**").access(authz.hasPermissions("can_manage_billing"))
        .requestMatchers("/api/reports/**").access(authz.hasPermissions("can_manage_reports"))
        .requestMatchers("/api/admin/**").access(authz.hasRoles("Admin"))
        .anyRequest().access(authz.isInOrg())
    )
    .oauth2ResourceServer((oauth2) -> oauth2.jwt(jwt -> jwt.decoder(jwtDecoder)));

    return http.build();
}

// We'll assume that the org ID is passed in in a header
@Bean
public Function<HttpServletRequest, String> orgIdResolver() {
    return (request) -> request.getHeader("x-org-id");
}
And that’s all! Our requests to /api/whoami will continue to succeed when a valid access token is passed in, but will fail otherwise.
Routes that start with /api/admin will require that you pass in an organization ID from the frontend, and then will make sure the user is an Admin in that organization.
Routes that start with /api/billing will require that you pass in an organization ID from the frontend, and then will make sure the user has the can_manage_billing permission in that organization.
If you want to do this at the method level, you can inject the Authz class into your API classes and perform checks there as well.
Quick Aside: Changing permissions based payment plan / customer
Authorization code typically starts off simple and always gets more complicated. If we look at the example above, we gated access to /api/reports based on if the user had the can_manage_reports permission.
Let’s say now we wanted to introduce a free plan, and the requirement is that reports are not on the free plan. Normally, this would mean updating our AuthorizationManager to pull in billing information and check the plan the customer is on.
Luckily, PropelAuth has a built in solution for that called Role Mappings, which allow you to change what permissions are available on a per-customer basis.
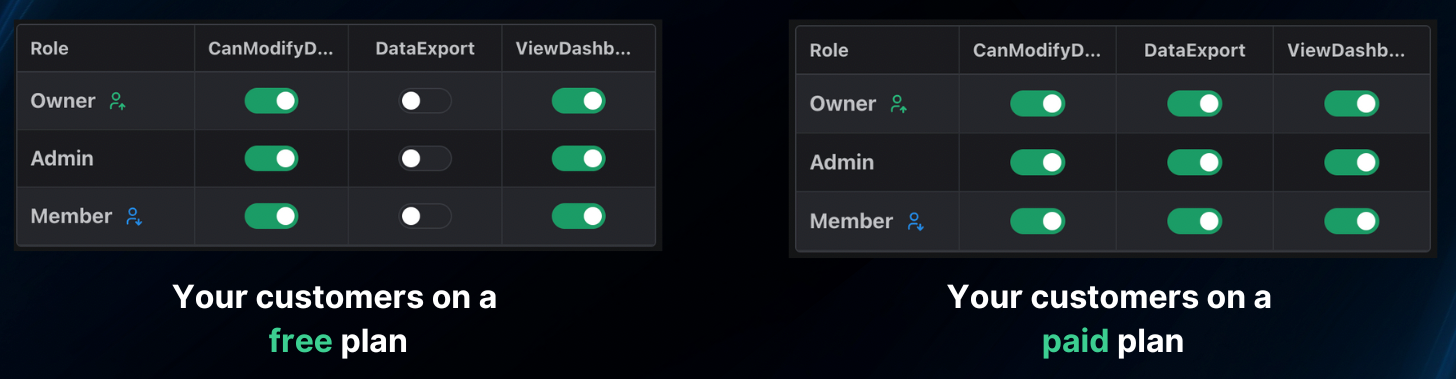
The beauty of that is that your code will never need to change, all you have to do is check if the user has the can_manage_reports permission.