Gating Paid Features with PropelAuth’s Role Mappings
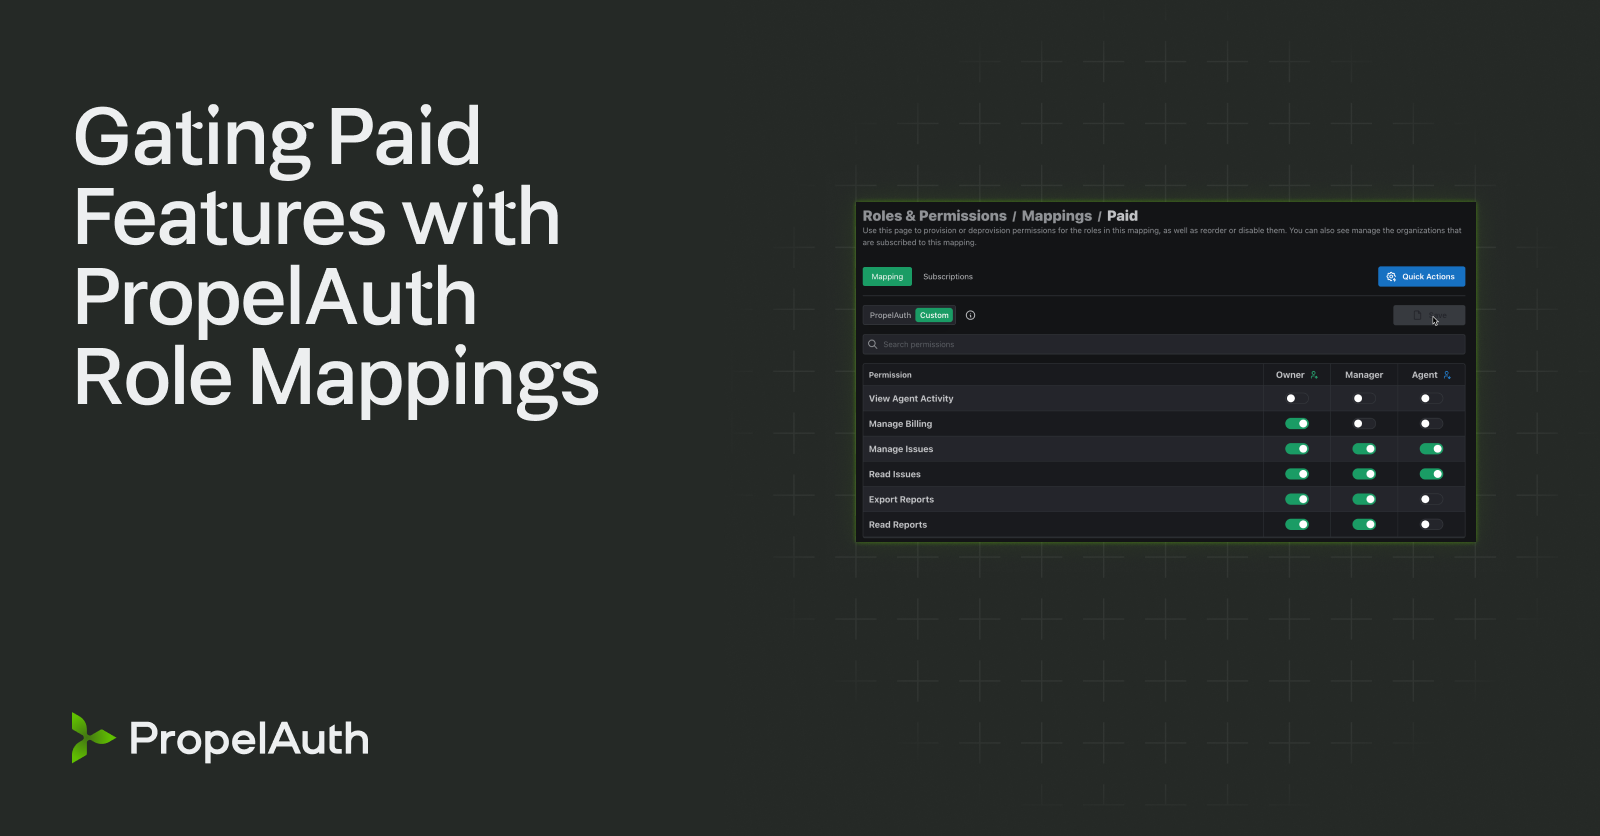
You’ve configured your SaaS pricing plans in your payment provider of choice but need a way to tie them to your product’s roles and permissions since several features are behind a paywall. What now?
Enter PropelAuth’s Role Mappings feature, which allows the creation of multiple role and permission configurations. You can use role mappings to ensure that your product's roles and permissions can be changed as users switch between paid plans.
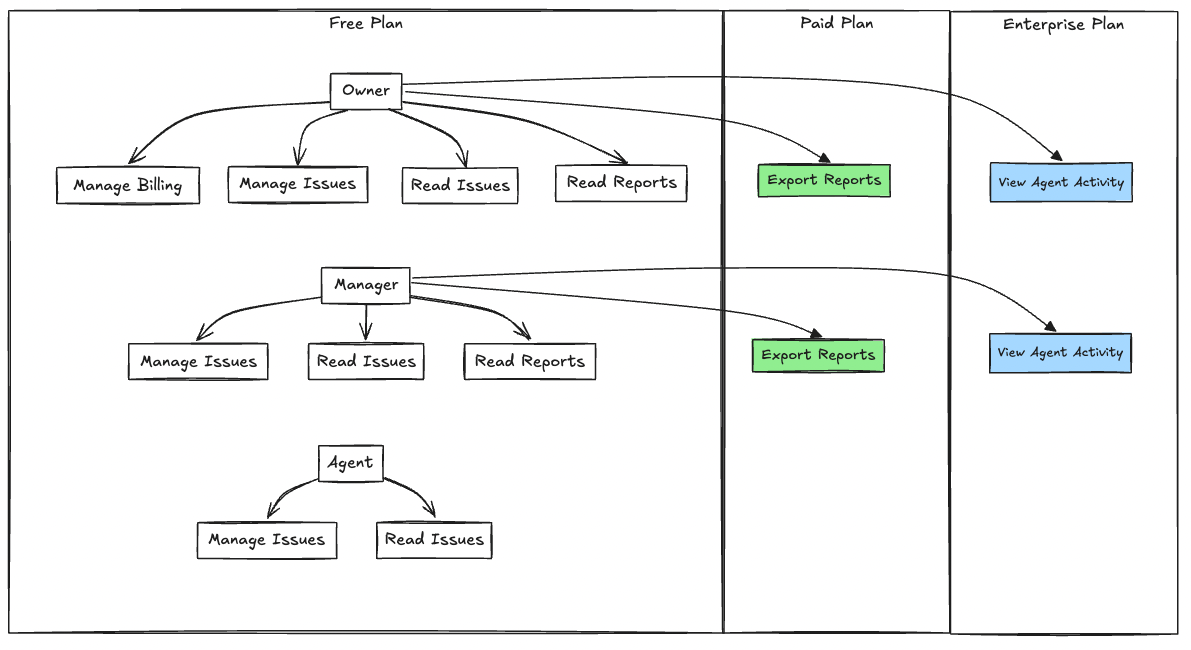
In this post, we’ll create free, paid, and enterprise pricing plans for a simple ticket system modeled after Zendesk, a popular ticketing and help center platform. Here’s an overview of roles and permissions that we’ll implement:
- We have three roles: Owner, Manager, and Agent.
- When users write to the Support team, a new issue is created. All team members can view and manage issues.
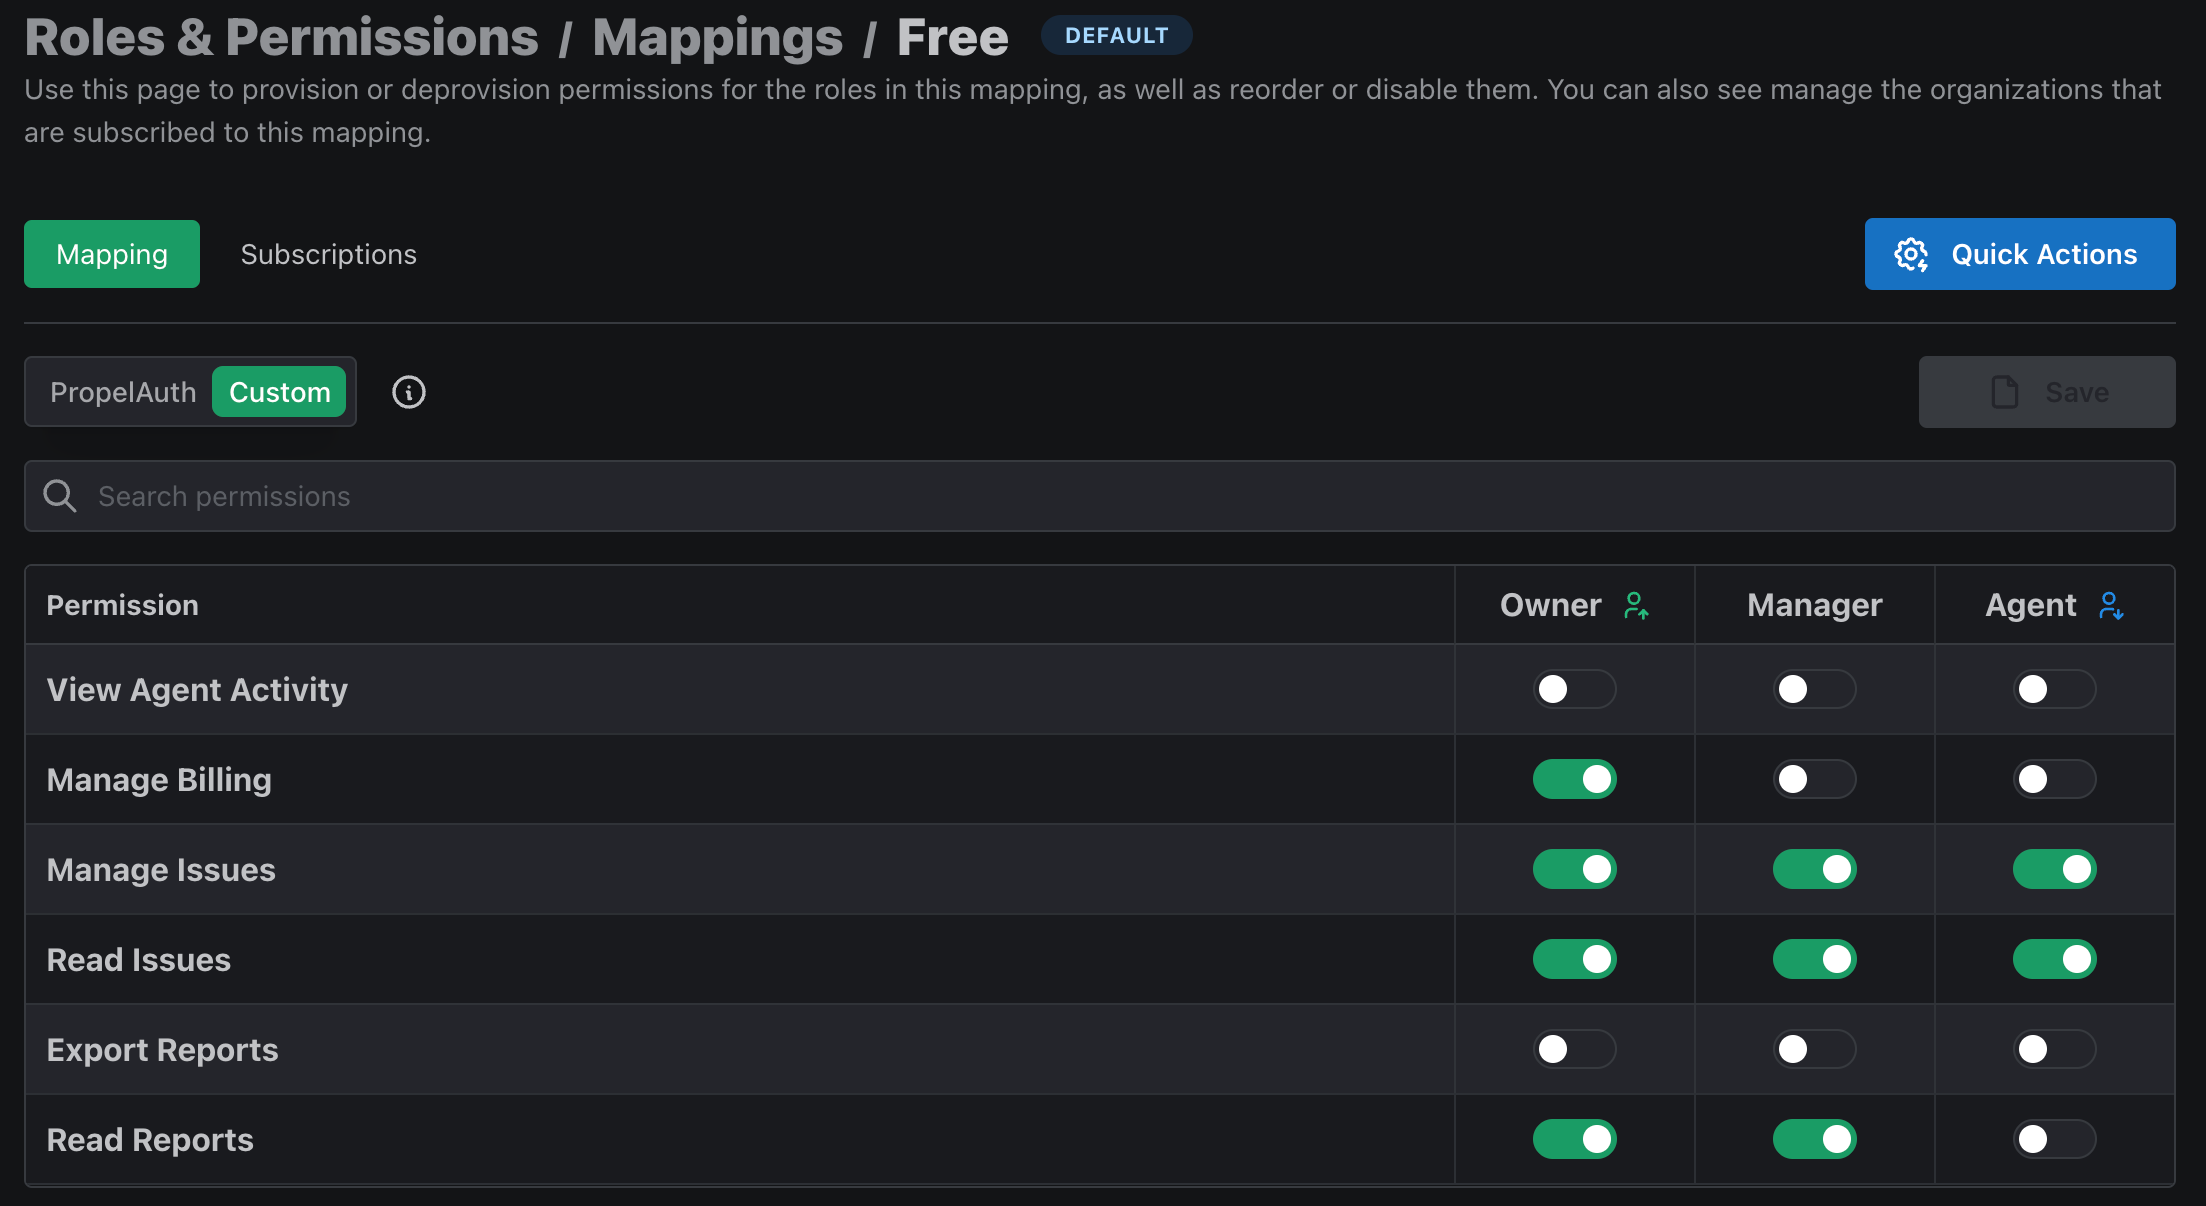
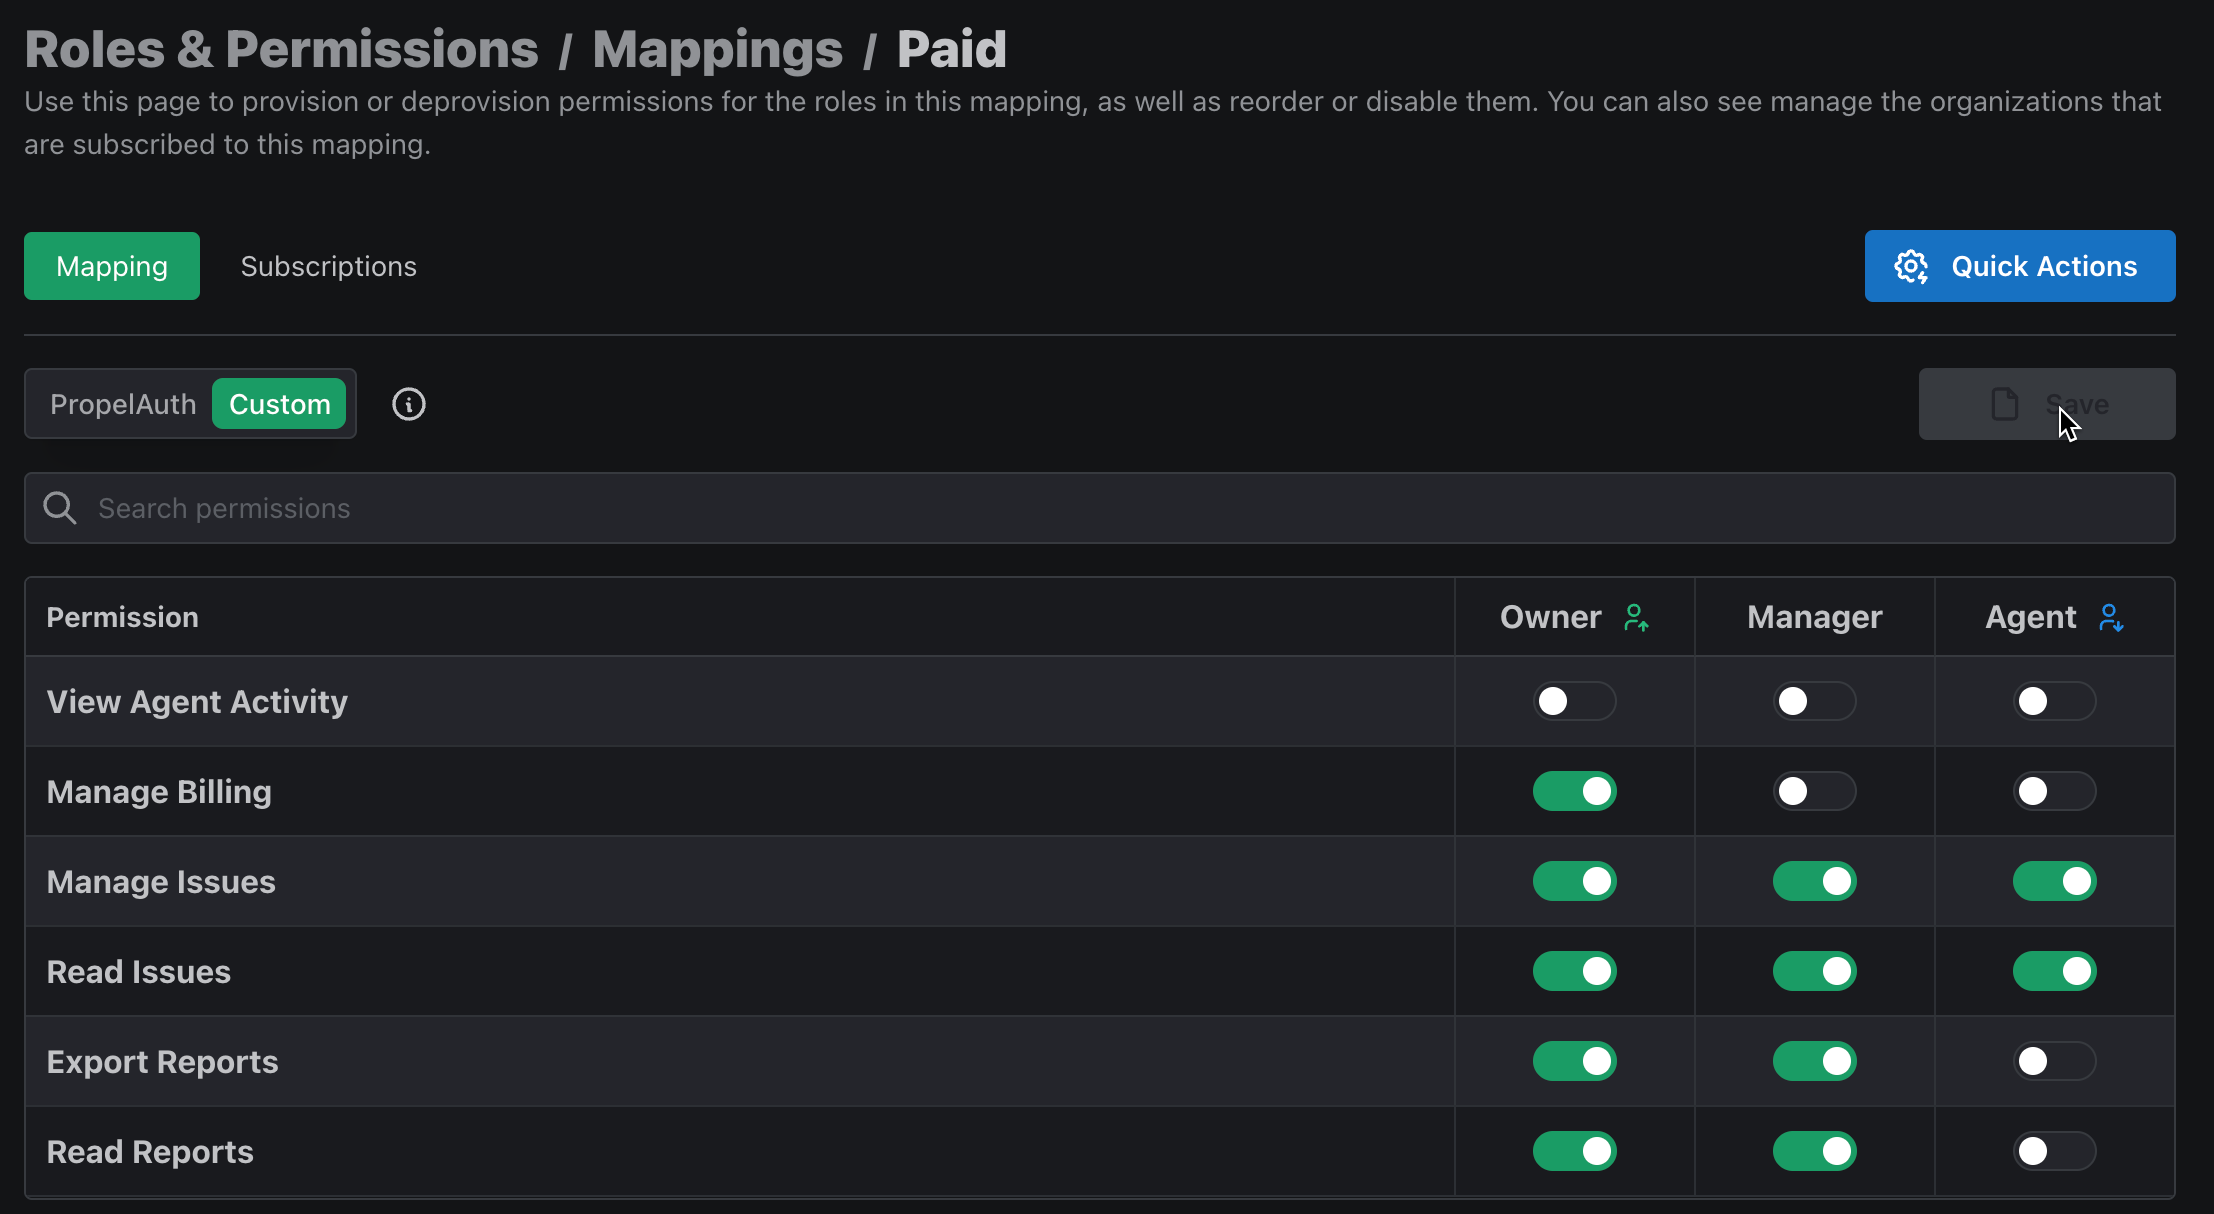
- Owners and managers on the free plan can view reports covering issue resolution, but users on the Paid plan who are Owners or Managers can export them only.
- Only Owners can access and change Billing across any plan since credit card details are involved.
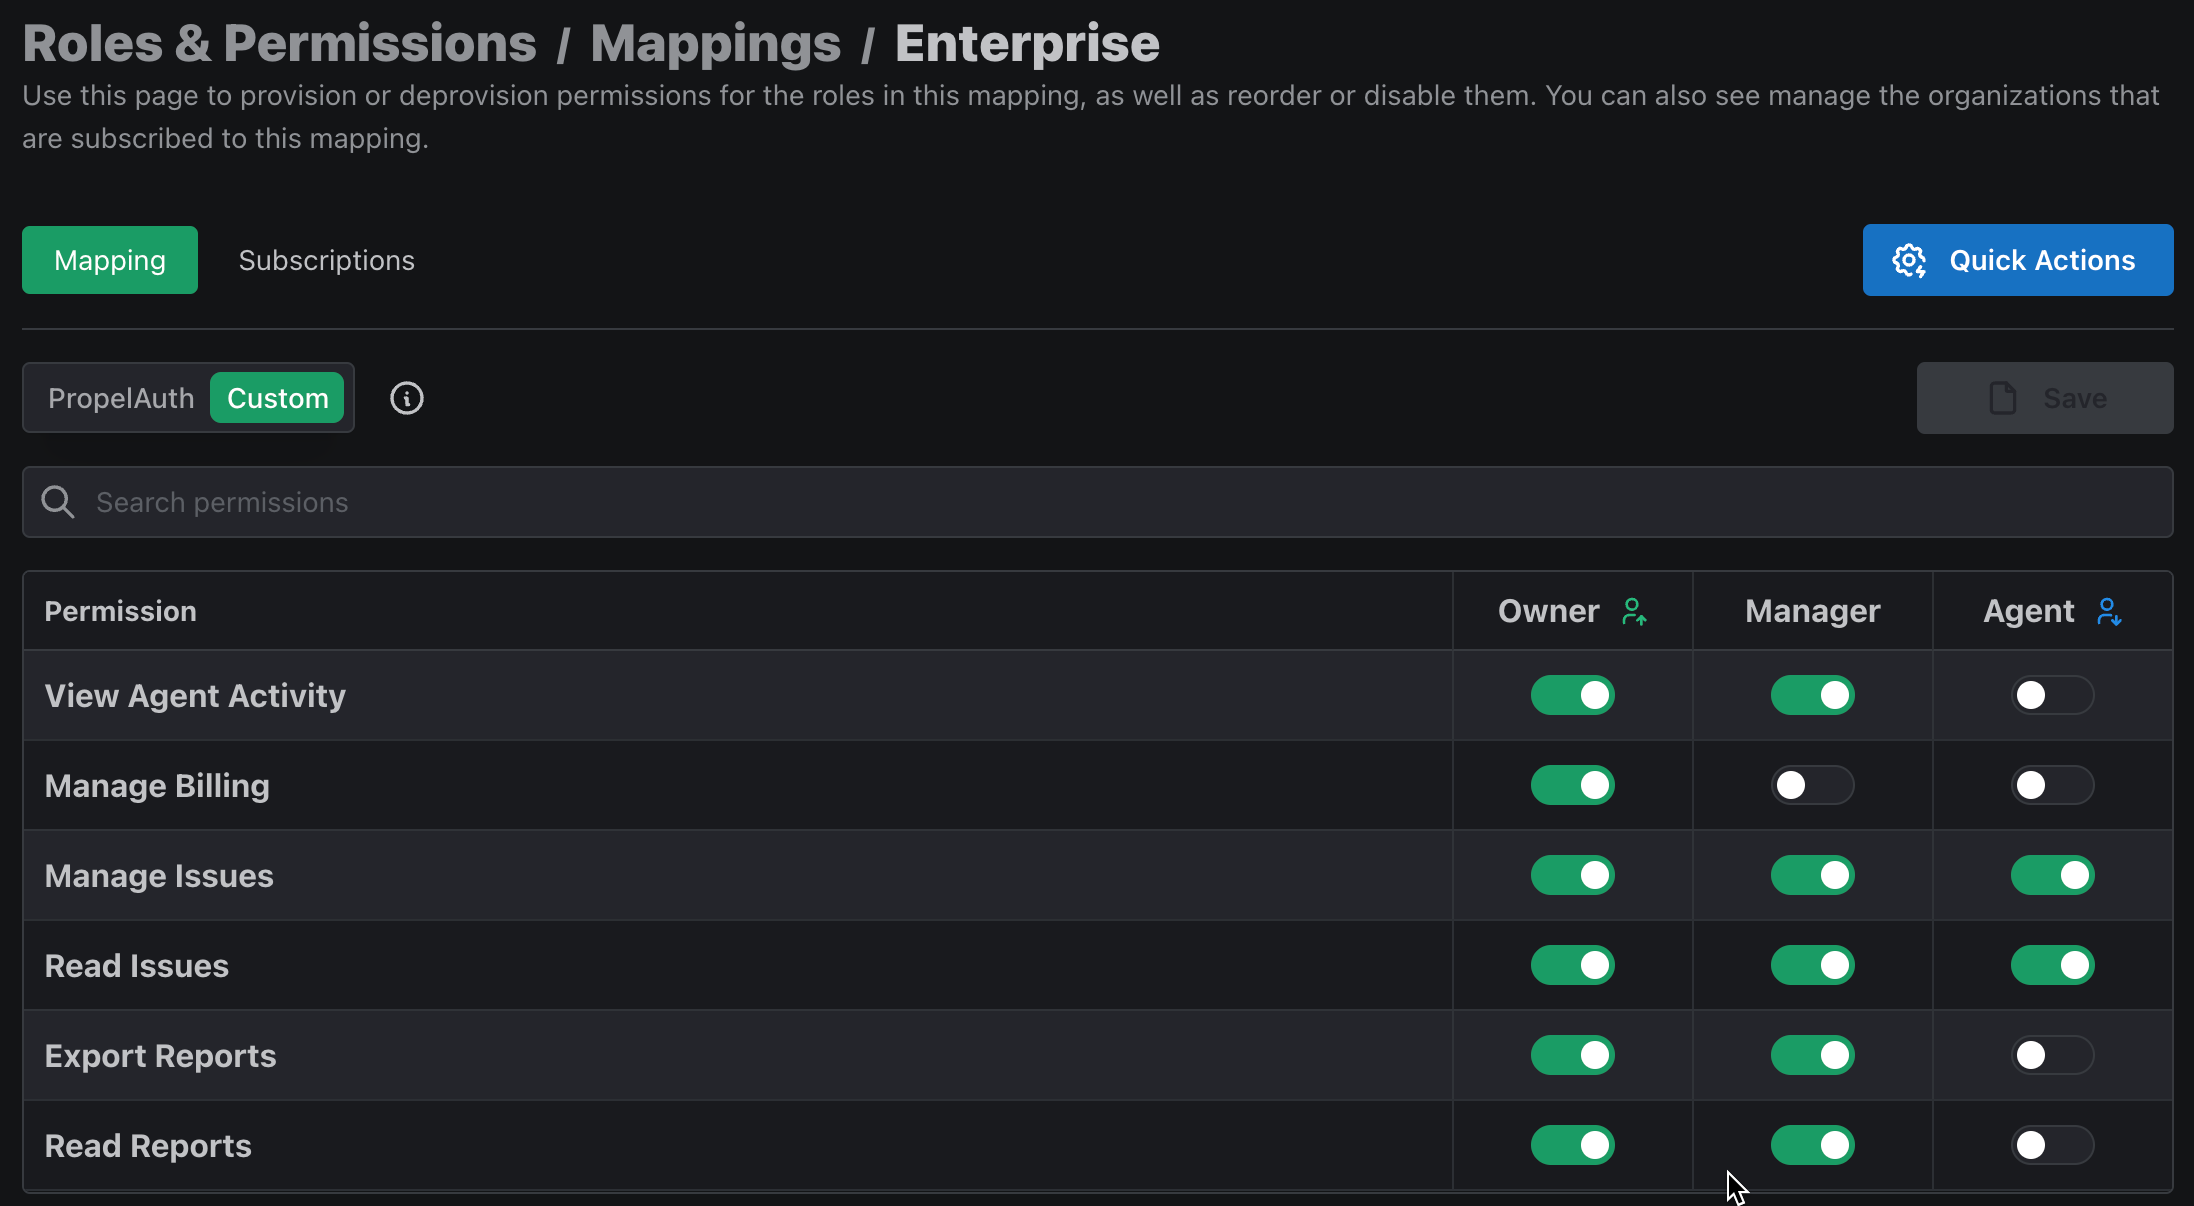
- Only Enterprise plans have the “live agent activity” feature, which shows agent statuses across all channels, how many conversations they are working on, and more.
To implement this use case, we’ll create three pricing plans using PropelAuth’s Role Mappings feature, which defines the relationship between roles and permissions.
Creating all of the pricing plans in this tutorial requires access to multiple role mappings. Upgrade to a paid plan now.
Here’s a diagram demonstrating the domain:
Implementation Steps
Follow these steps to implement free, paid, and enterprise pricing plans in PropelAuth.
1. Rename Roles
By default, PropelAuth provides Owner, Admin, and Member roles. To match the ticketing system nomenclature, rename Admin to Manager and Member to Agent. In the PropelAuth dashboard, navigate to Roles & Permissions → Roles. Click the gear icon next to each and choose Edit Name.

2. Define Permissions
Permissions in a ticket system will vary. Here are the permissions we’ll create:
- Manage Billing
- Manage Issues, Read Issues
- Read Reports, Export Reports
- View Agent Activity
To create a new permission, navigate to Roles & Permissions → Permissions. Click the Add Permission button. In this example, we’ll create the “Manage Billing” permission.
We recommend using a common structure for the IDs, such as “feature::action” where “action” is one of the CRUD operations (create, read, update, delete).
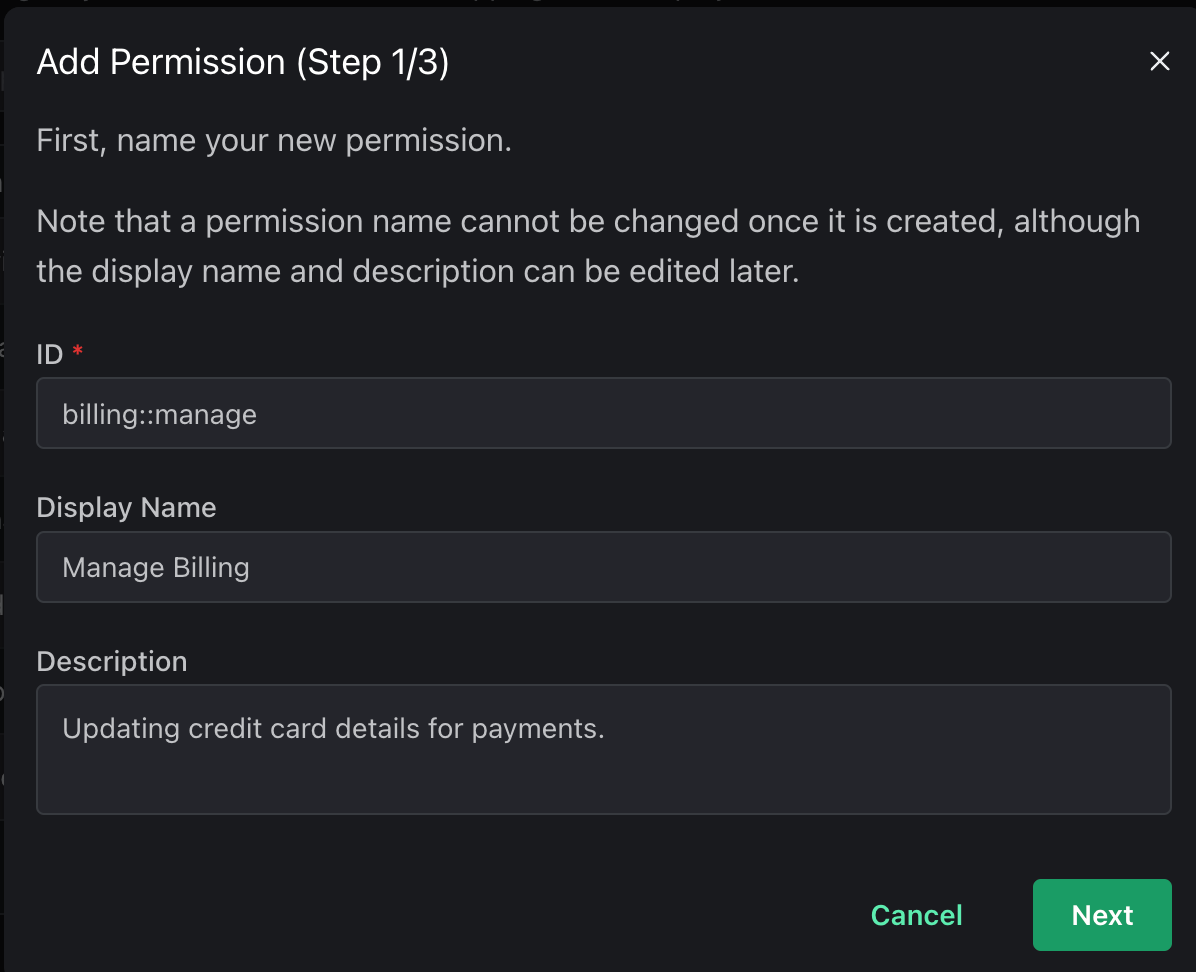
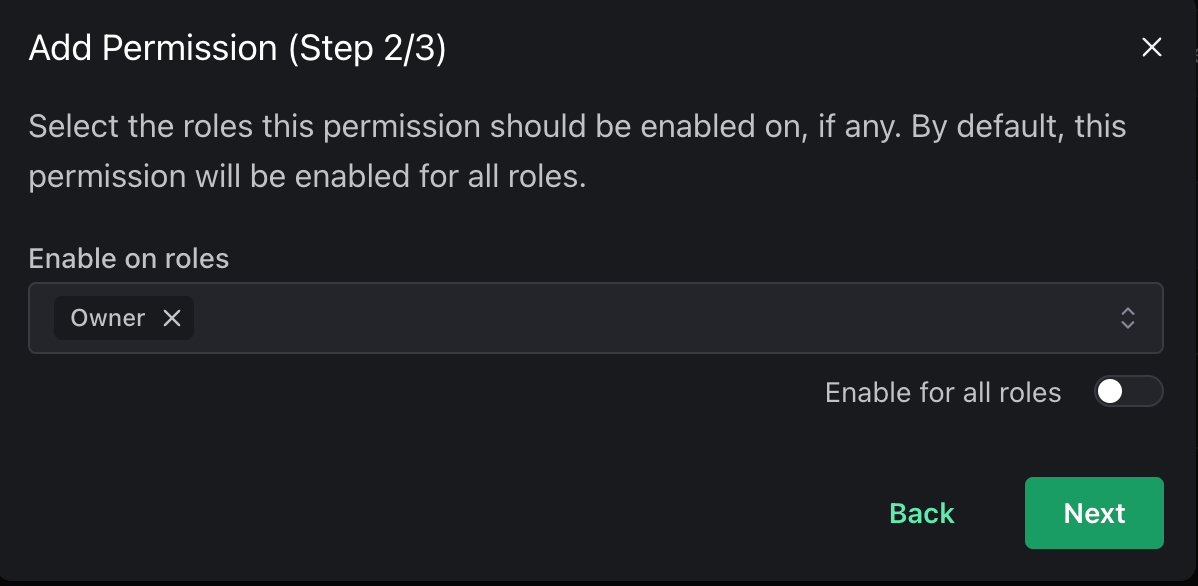
On the next screen, click to disable “Enable for all roles” then select the Owner role only since other employees shouldn’t have access to company credit card data. On the last screen, click Add Permission to create it.
3. Define Role Mappings
Most of the magic in this pricing plan use case is implemented with role mappings, which define the relationship between roles and permissions. Head over to Roles & Permissions → Mappings. First, click the three dots on the right side to rename the default role mapping to “Free,” then click Rename Mapping.
Role Mapping: Free Plan
Click into the Free plan role mapping, then choose the Mapping → Custom tab. Disable access to Export Reports on all plans since that should be a paid feature. Also, ensure owners only have Manage Billing permission.
Paid Plan Mapping
Next, create a new Role Mapping named “Paid.” Since the paid plan is mostly the same as the free one, choose the “Free” plan as the mapping to duplicate. On the next screen, keep the PropelAuth permissions the same. Next, enable Export Reports for Owners and Managers since that is a paid feature.
Enterprise Plan Mapping
The final role mapping we need is the Enterprise plan, which represents features only large businesses need. Create another new Role Mapping and copy the Paid plan mapping. In this example, our application has a “live agent activity” feature, which shows agent statuses across all channels, how many conversations they are working on, and more. This is available only to Enterprise plan users, so enable View Agent Activity permission for Owners and Managers. In application code, we can restrict Managers to only view their team's agents.
With all three pricing plans implemented, there’s one last step.
4. Subscribe Organizations to Role Mapping(s)
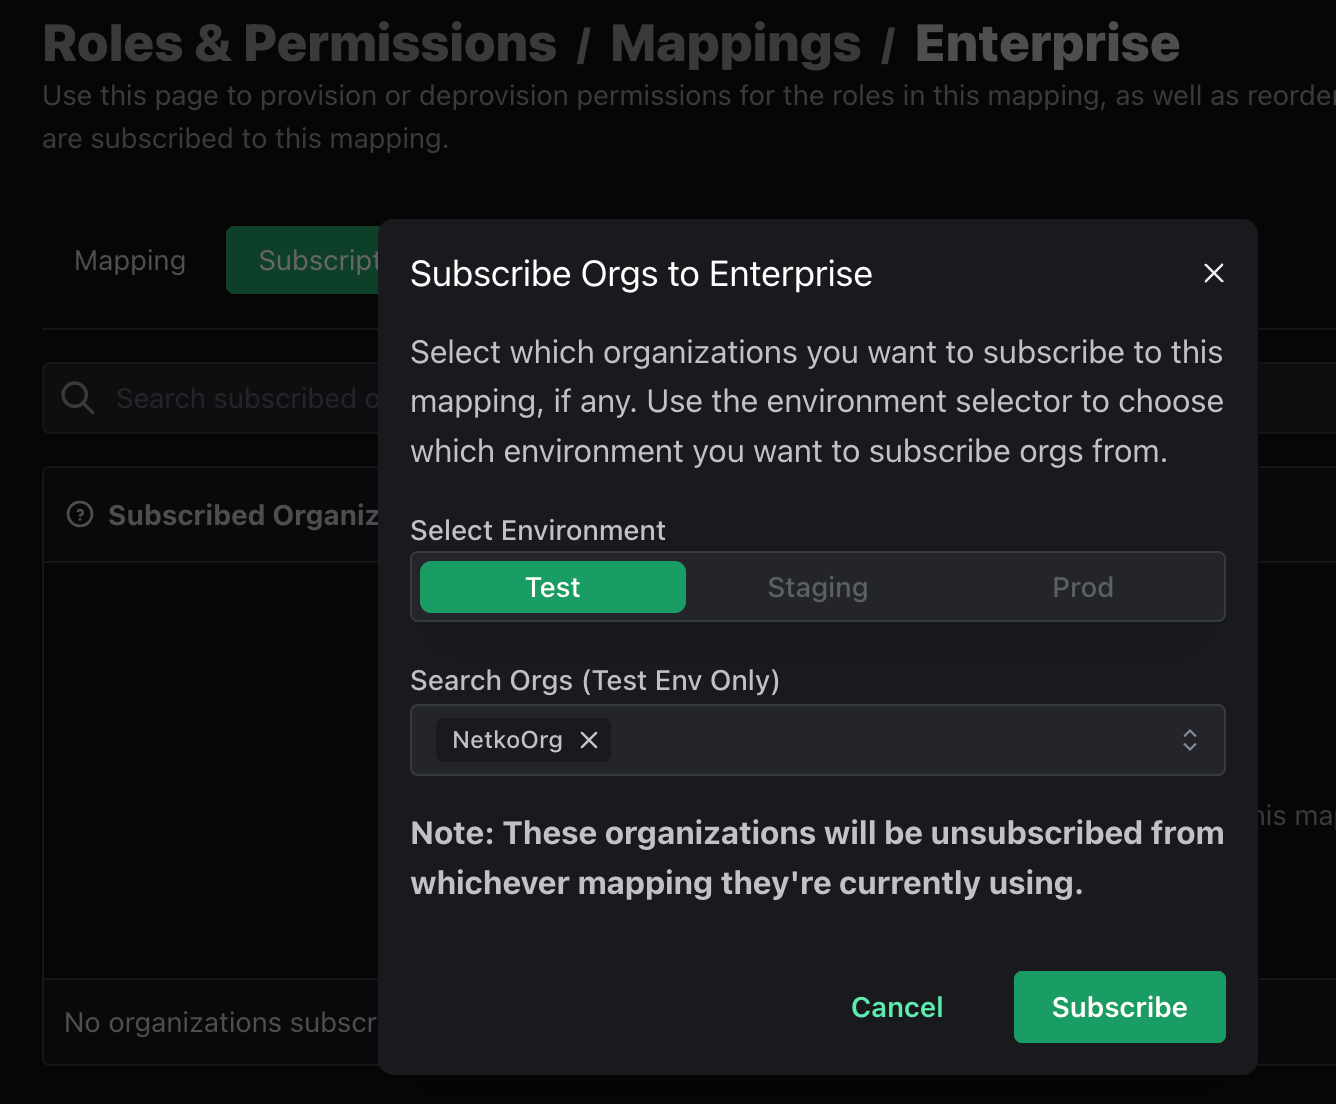
In order for the above role mappings to take effect, we need to assign them to organizations. Organizations in PropelAuth are groups of users that use your product together, such as companies, teams, etc. Let’s assign the fictional “NetkoOrg” company to the Enterprise pricing plan. Navigate to the Enterprise Role Mapping (Roles & Permissions → Mappings → Enterprise) then select the Subscriptions tab.
Click the Add Subscriptions button, choose the Environment, then select the organization to assign to the Enterprise role mapping.
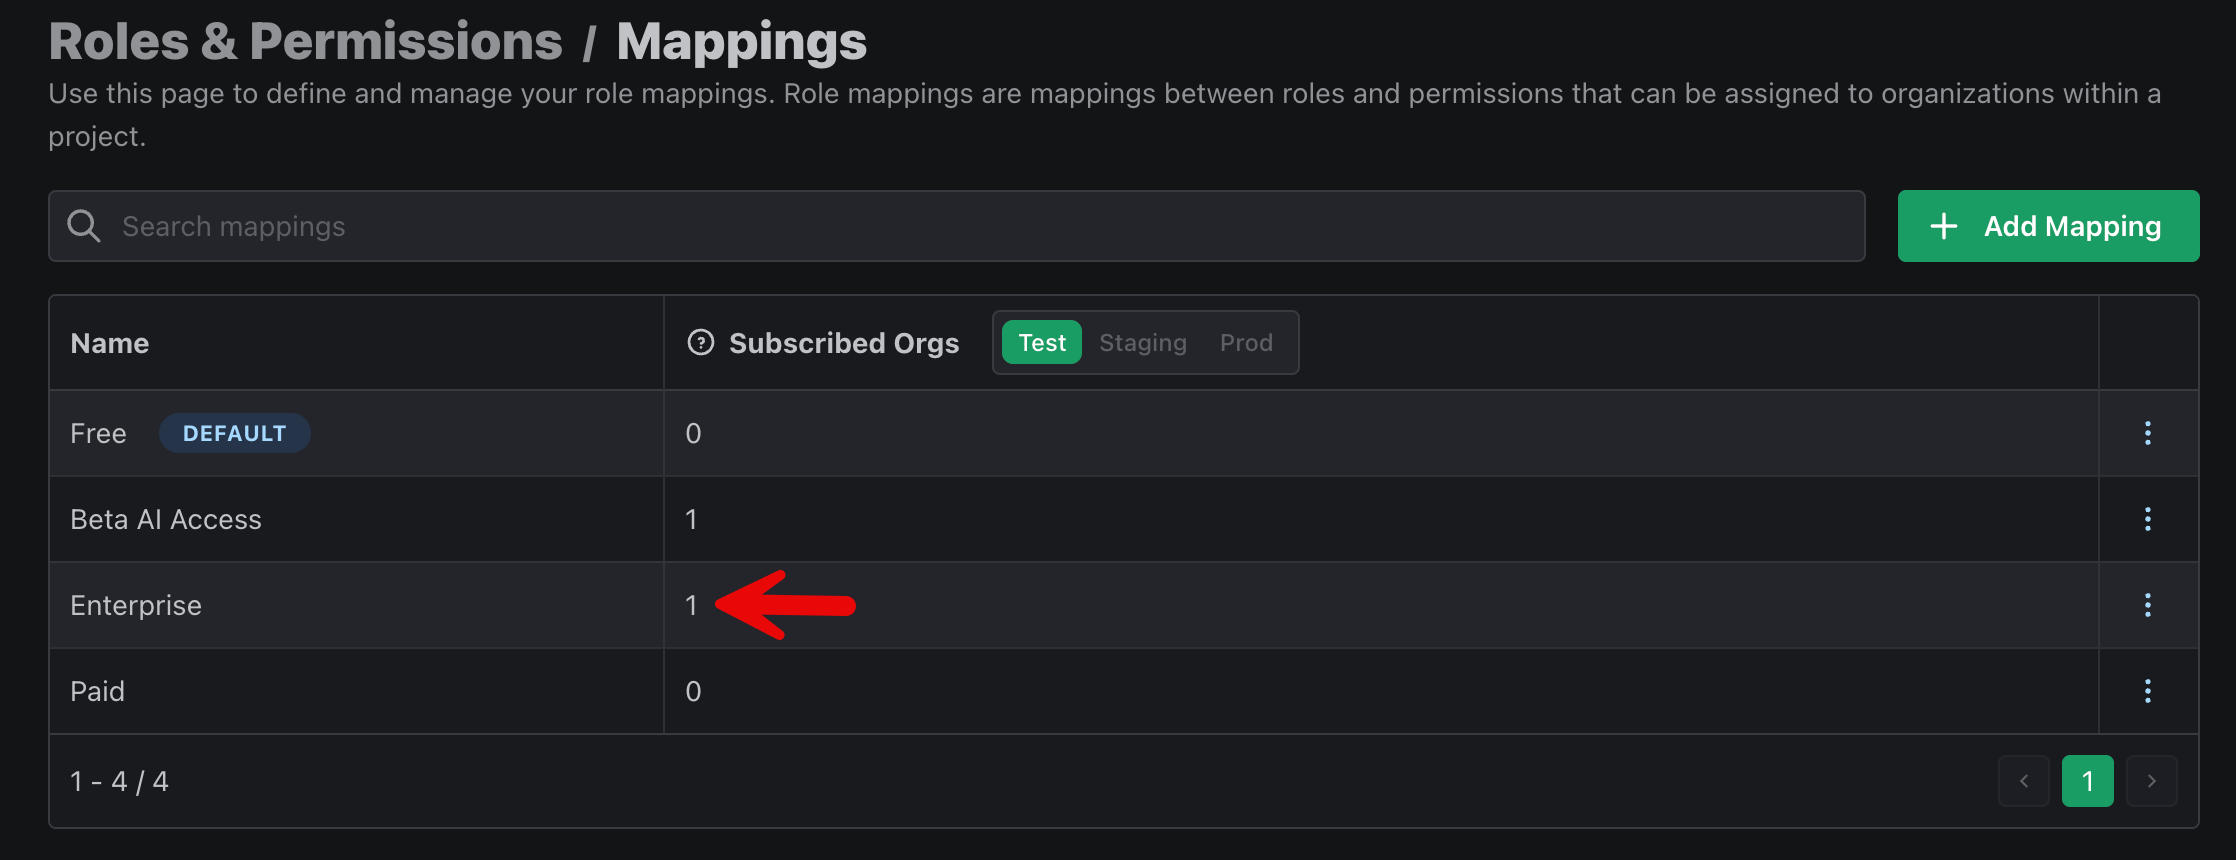
Back on the main Role Mappings page, we can now see that one organization has been assigned to the Enterprise Role Mapping.
In application code, a simple permission check will allow only Owners or Managers in an organization tied to the Enterprise role mapping to access the agent activity feature:
const user = await validateAccessTokenAndGetUserClass(authorizationHeader);

// Owner and Manager: true
// Agent: false
// Also permitted due to being an Enterprise organization
user.hasPermission(orgId, "agent_activity::view");
We’ve created a robust pricing plan structure using PropelAuth’s Role Mappings feature in just a few steps. Now, let’s look at common real-world scenarios you and/or your users may encounter and how to handle them.
Scenarios
Owner upgrades to Paid Plan
The Owner of an organization is on the Free plan but wants access to additional features. After they upgrade to the Paid plan, grant their org access by changing their role mapping to “Paid” using subscribeOrgToRoleMapping:
auth.subscribeOrgToRoleMapping({
  orgId: "1189c444-8a2d-4c41-8b4b-ae43ce79a492",
  customRoleMappingName: "Paid"
})
Afterward, check that they have permission to Export Reports, which will return true.
// Before - Owner and Manager: false
// After - Owner and Manager: true
user.hasPermission(orgId, "reports::export");
Owner upgrades to Enterprise Plan
Similarly, the organization Owner might upgrade to the Enterprise plan to access features unique to enterprises, such as the agent activity viewer.
auth.subscribeOrgToRoleMapping({
  orgId: "1189c444-8a2d-4c41-8b4b-ae43ce79a492",
  customRoleMappingName: "Enterprise"
})

// Before - Owner and Manager: false
// After - Owner and Manager: true
user.hasPermission(orgId, "agent_activity::view");
Summary
PropelAuth's Role Mappings feature makes it super easy to set up different pricing plans with custom permissions. In this post, we created three roles (Owner, Manager, and Agent) and gave them varied access across Free, Paid, and Enterprise tiers. The best part? Role Mappings are flexible, so you’re now equipped with the knowledge to customize them for your app!
You'll love how simple it is to set up pricing plans with PropelAuth's easy-to-use roles and permissions system. As your app grows, you can rest easy knowing that managing user access and features will be a breeze.

